Insulating Bedroom Walls
How to Insulate Solid Walls Yourself and the Options for Internal Wall Insulation, From Insulation Wallpaper to Warm Battening and More
Learn how to insulate internal walls yourself in a variety of methods. Walls that have not been insulated can lose anywhere between 30% and 45% of the heat in your home. By adding insulation to solid walls can make a significant different to heating bills. We will look at the options to available to insulate the inside of solid walls and which are the most suited to the DIY enthusiast. We will cover insulation wallpapers, such as Sempatap to battening and adding internal insulation to stud wall solutions, so you can understand which will be most appropriate for your home.
By insulating walls in your home, this will stop the heat escaping, keeping your home warmer and also helping to reduce energy costs. In essence, there are three types of wall insulation:
- Cavity Wall Insulation – this is where the cavity is filled with insulation. If a cavity is present then this is the quickest, cheapest and least disruptive
- Internal Wall Insulation – This refers to insulation applied to the internal side of all the external walls
- External Wall Insulation – This is insulation that is applied to the outside of a home
You can see a simple and succinct explanation of the differences between these types of insulation at Be Energy Smart. In this project we will focus on Internal Wall insulation. This is where the inside of the external walls are insulated (not the internal walls of the property – this can be confusing!). It is most commonly used for solid walls, as it is generally cheaper and more effective to insulate the cavity if there is one, but in some circumstances it is used for cavity walls too.
Solid Wall Insulation
The amount of heat we lose from our homes, through poor insulation, is staggering. Up to 45% of all the heat lost comes straight out of the external walls. This is especially true of the 10 million homes in the UK which do not have cavity walls. The Energy Saving Trust claim that saving of around £455 a year can be made for an average sized detached home.
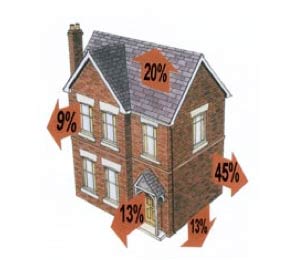
Percentage of heat loss from your home
Much fuss (quite rightly) is made of Loft insulation, double glazing and low energy bulbs etc, but a colossal amount of heat is simply disappearing through the walls of older properties which were not built to the high insulative standards we have today.
At the moment, often the only protection against this loss is a 13mm layer of plaster and maybe two coats of paint or a sheet of wallpaper! If you have a solid wall or if it is not possible to fill your cavity, then you can insulate either the inside or the outside of the external walls of the property.
Adding insulation to the outside external wall is typically not a DIY job and will generally require a professional firm.
Adding insulation to the inside of an external wall however, is something that can be done DIY in some cases yourself. Look here if you need to find a professional insulation installer to help you.
Read on if you fancy having a got yourself and want to know what's involved.
If your home is not made from brick, block or a stone type construction, such as a timber frame of metal building then you will need to consider other insulation techniques. If this is the case it is worth contacting the National Insulation Association.
The Benefits and Disadvantages of Internal Walls Insulation
When it comes to insulating solid walls there are certain benefits over external wall insulation. These included:
- Cost; The cost of internal wall insulation is going to be around £40-£50 per sq m (December 2016) which is around half the cost of external wall insulation. Around 60% of this cost will be the labour so there is likely to be an even greater saving if you do it yourself too
- Covering cracks and blemishes; Covering the wall with some insulation can hide cracks that might appear in the plaster on the original walls. The insulation can cover up bigger problems too, so you need to be sure that these have all been address before you insulate
- Ease of installation, especially if doing it yourself; There is no need to get scaffolding and the specialist skills and equipment to fit the insulation externally and make any potentially necessary adjustment to the eves and the roof
- More appropriate for flats and maisonettes; Practically it is not often possible to insulate a single flat externally and if all the other residents of the building don't agree then the only option is to insulate the inside of the walls
- Insulation for Conservation areas: Internal wall insulation might be the only option if you live in a conservation area, or if you have a particularly beautiful home and don't want to change the character. This does work both ways, as if you actively want to change the look of your home adding external insulation might be a great way to do it.
There are a number of considerations that need to be taken into account before choosing to insulate the internal wall. These include:
- Condensation – Condensation occurs when warm, moist air is cooled and the water forms on a cold surface. If you insulate the wall from the inside then the wall is no longer heated by the room and will get colder, which can sometimes result in condensation – More can be found in our condensation causes and cures project here
- Damp and other issues needed to be dealt with first. Before you can even start to consider internal insulation you need to have sorted out all the other issues with the external wall. You do not want to simply cover these up with the insulation for them to come back and haunt you another day. Find out more about damp causes and fixes in our project here
- Reduction in room size – To be really effective the insulation need to be in the region of 100mm thick. This space will obviously be taken out of the available living space in the room. There are options that take less space, as you will see below but there is a trade off with the effectiveness of the insulation
- Disruption of removing and moving all the internal fixtures and fittings – this is only on the inside of the external wall of the house so is not on every wall, but even so this can be quite disruptive. All radiators, light fitting and switches will need to be removed and then replaced on the new interior wall with the insulation fitted behind
- Hanging pictures and TV's on the insulation can be difficult – Finding fixings that will be secure for heavy objects like a TV can be difficult as the insulation will not provide a sound anchor. When fitting a kitchen, the units can be secured to battens which will need to be positioned in the right place for fixing to before the plaster boards are fitted over the insulation
When you have weighed up the pros and cons of internal wall insulation over the other options you can when decide on the approach you are going to take to insulate your walls.
The Options for Internal Solid Wall Insulation
Depending who you talk to they will tell you there are different options for insulating internal solid walls. In order to get a really good feel for all the options that you can consider we are going to cover the full range, even if some would not be considered true internal wall insulation by the purists!
There are broadly 4 options that you can consider, in order of increasing effectiveness (and effort):
- Insulation Wallpaper
- Insulation Boards
- Warm Battens
- Stud Walls
We will cover each of these options in greater detail below, including the relative pros and cons for each one. First let's see how to fit the insulation.
How to fit Internal Solid Wall Insulation Yourself
Whichever option that you decide is right for you, the process is pretty much the same. We will cover any specific differences when we cover each of the options below.
Here is the process for fitting internal wall insulation yourself:
- Complete any remedial work to the wall being insulated. Ensure that the wall is not damp and is structurally sound. It is going to be covered so you want to know that there are no potential problems hiding away to come back and bite you later (when it will be much more expensive to remedy)
- Choose your preferred option for insulating the internal side of the wall. A little research and potential discussion with the manufacture is worthwhile to understand what thickness of insulation is required for your particular application and what effect this will have on the wall. As we mentioned before the wall will become colder and this can cause condensation; the more effective the insulation the greater this effect will be
- Plan how to fit the insulation to the reveals (Windows and Doors) and other tricky areas such as the floor voids and areas where cold bridges (see below) might occur
- Remove all the fixtures and fittings from the wall. This will include all the light fittings, switches, radiators, kitchen cabinets, skirting and coving. The wall must be completely bare so that the insulation can be fitted before these fixtures be refitted again
- Complete the preparation work. This will vary depending of the insulation option that you have chosen. The manufacture of the insulation will indicate what preparation is needed to complete the installation of their insulation. They often specify proprietary adhesives for example
- Fix the insulation and/or build the stud wall, depending on the method that you have opted for
- Seal the joints and complete any finishing work such as skimming plasterboard
- Replace all the fixtures and fittings, including (follow the links for specific installation instructions on each):
- Light fittings
- Switches
- Kitchen cabinets and wall units
- Cupboards
- Radiators
- Coving and Skirting and Architrave
A "Cold Bridge" is something that conducts the cold from a colder part of the wall, typically outside, to a warmer part of the wall. This can create a cold spot which in turn can cause condensation. A common cold bridge can be caused by cavity wall ties which form a cold bridge from the colder outer wall, across the cavity to the inner part of the wall.
As you can see, this is potentially a job that can be done yourself, but it can be quite a big and disruptive project, particularly if you are living in the property at the time. If you need to find an installer have a look at our find a tradesman page on the link above.
Now that you know how to fit the insulation on the inside wall we will review the various options that are available.
Insulation Wallpaper
This solution is also know and Thermal Liner or Insulated Wallpaper and is designed to be applied like wallpaper making it a very easy way to add insulation. It is typically not very thick being between 3-10mm and therefore will not provide a huge amount of insulation.
One of the leading products on the market is called Sempatap Thermal. Sempatap Thermal is a 10mm "Magic Wallpaper" which, unlike the old rolls of polystyrene wall insulation, carries a fire rating of class M1. It's unique construction allows it to be redecorated, filled and even tiled. It has very high insulation ratings both in warmth and sound and it provides a very warm wall solution to condensation. There is even a type of Sempatap which is specifically designed for floors – Sempafloor.
Sempatap comes in rolls which are 1m wide and 12.5m long. They are applied just like wallpaper with a special Sempatap adhesive. Joints can be filled with decorators caulk and, when finished the walls can be decorated just as your original walls would be.
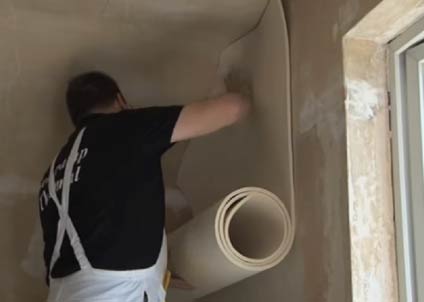
How to hang Sempatap Insulation rolls
Wallpaper can be stripped from Sempatap walls, even with a steam stripper. Should you accidentally damage the fibreglass surface it can be made good easily with polyfiller or plaster. Sempatap has a life span longer than plasterboard and it can be stuck to ceilings as well. Not only will it keep you warm, but it will reduce noise considerably.
For more information on Sempatap application in your home, visit our video section here.
With such a thin layer of insulation this is not going to stop a huge amount of heat escaping, but it the easist and cheapest option to fit. Jeff Howell writing in the Telegraph suggests it will cost around £18 per sq m, although with the low insulations properties he suspects that the payback with be in the region of 60 years. Care should be taken to ensure that using an insulation wallpaper like this does not cause condensation; ensure that the wall is dry and whatever waterproofing barriers that are recommended by the manufacturer are used.
There are other benefits. Sempatap was developed in France where it seems to be used primarily as a sound proofing product, so this will help if you need to insulate against sound as well. These insulation wallpapers are great at covering up cracks that can occur if you home is prone to them, as they offer a level of flexibility to overcome the movement that causes these cracks.
While they certainly do not offer anywhere near the level of insulation that "proper" insulation will provide they will make the walls feel warmer and provide some increased comfort for relatively little effort.
Some of the most common types of Insulation Wallpaper or Thermal Liners can be found on Amazon (click the links below to find out more). Here is a selection of the most common types:
- Sempatap: Possibly the most well known brand of insulation wallpaper
- Wallrock Thermal Liner: A very popular alternative to Sempatap
- Wallrock KV600 Thermal Liner: A slightly thicker and therefore more insulating, but more expensive version of the original Wallrock Thermal Liner
- Polystyrene Wall Insulation: A cheap but effective way to use insulating wallpaper, although somewhat less robust than other products
Insulation Wallpaper is not typically considered a true internal wall insulation measure, but we have included it as it is a good, cheap solution what will certainly have some effect. While the payback is questionable, if you are re-decorating anyway this is less of a concern.
Insulation Boards
The next step up is to use rigid insulation boards. These can either be insulated plaster boards or specifically designed products with insulation bonded on to plasterboard with a vapour barrier between the two.
Once the wall has been prepared, the insulated plaster boards can be stuck directly on to the wall with an adhesive or screwed with mechanical fixings. The wall does need to be in a good condition and reasonably flat. You must be absolutely sure that the wall is not damp or you will simply cover this up and make matters worse in the long run.
If you use screws to fix the insulation boards, then you will inevitable puncture the moisture barrier. This cannot be helped and is the disadvantage of using screws, however to get a secure fixing this might be necessary.
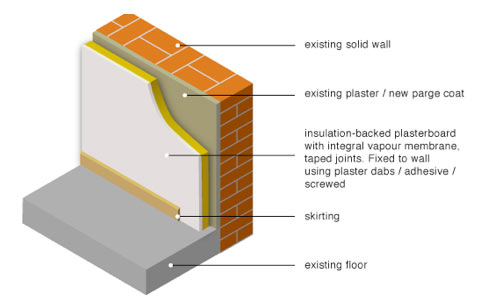
How to Fixing Insulation Boards to add Internal Wall Insulation – Image courtesy of GreenSpec
You might chose to fix battens to the wall which you can then fix the insulation boards to, however you must use treated battens as by adding the insulation you are going to make the wall colder and potentially create condensation. Because of this condensation issue the use of battens needs careful thought, and potentially some DPC between the wall and the batten to reduce the effects of the moisture on the wooden batten.
How to install Solid Wall insulation with Battens
In between the boards there will be gaps. These should be filled with mastic so that there is a continuous moisture barrier. You could probably get away with simply skim plastering the wall and covering these gaps, but we don't believe that it is worth the risk if you are going to all this trouble.
There will almost certainly be a gap at the bottom where the wall meets the floor. This needs to be sealed also so that there is a continuous vapour barrier. If there is a floor void then this should be insulated also.
How to Insulate Floor Voids and Gaps – Image courtesy of GreenSpec
The big advantage of this method is that it is relatively cheap and quick. This is a great project for a confident DIY enthusiast. It will be considerably more effective than using a thermal liner or Insulating Wallpaper, so will make a noticeable difference to heating bills and should offer you a reasonable payback time (certainly within 20 years, probably much less), particularly if you do it yourself.
It might not be suitable for all walls, as the wall should be reasonably flat to start with.
Also when it comes to securing objects to the insulated wall it can be problematic. The insulation will not take any real weight, so fixings need to be secured through to the wall beneath, which will often not be secure long term.
This is a problem when it comes to fixing kitchen cabinets and heavy objects such as TV brackets. Battens can be used to secure to over come this problem but this requires a little forethought to ensure that they are in the right place.
The materials that are used for this type of solid wall insulation are generally much more expensive than insulating wallpaper or standard insulation, but the speed and ease of installing a solution like this makes it a good alternative to the other types of internal wall insulation.
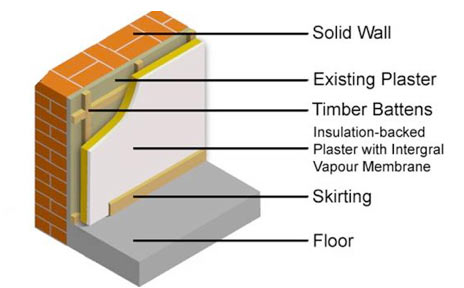
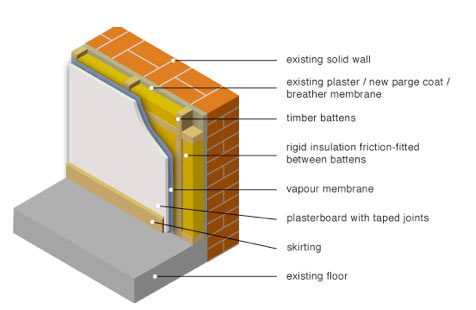
Warm Battens
Warm Battens are a very similar way to adding internal wall insulation to the method described above. The big difference is that the battens are fixed on top or inside the insulation and then the plaster boards are fixed to them directly.
How to fit Internal Solid Wall Insulation with Warm Battens – Image courtesy of Homebuilding.co.uk
It is not as common as it is more time consuming and slightly fiddlier to do, but there are some definite advantages.
The battens will be much less prone to rotting as they will not be against the cold wall where condensation and moisture will get to them. The battens will be directly under the plaster board so providing an anchor point for fixing heavy objects, like the TV and kitchen units.
By using battens, this allows you to choose insulation that is less rigid, and cheaper, as it will be held up by the battens. This can go some way to offsetting the extra cost (and time taken to install) the battens.
How to Insulate a Solid Wall with Battens and Internal Wall Insulation
Another common option is to have the battens with the insulation in between. This does not protect the wooden battens so well, but still provides a good anchor for fixing both the plaster board to and heavy objects to be hung on the wall.
The position of the vapour barrier is another consideration. The answer is generally to put it where it is going to be punched or perforated by fixings the least. As the battens are going to be screwed to the wall which will cause perforations, the barrier generally sits on top of them at the back of the plaster board.
The foil backing on many insulation boards (such as Celotex and Kingspan) is generally a suitable vapour barrier. If you have opted for expanded polystyrene you will need to get a vapour barrier separately.
It might also be possible to include an air gap between the battens and insulation and the pre-existing wall. If you do this you are moving on to the Stud Wall method of internal insulation.
Stud Walls
This method is simply taking the battens away from the existing wall to create a void behind the new insulated stud wall. Ideally the stud wall should be 100 mm thick with a 50 mm gap behind. Find out how to build a stud wall here.
It is the most expensive and time consuming method, and it will take up considerably more internal space. It is no more effective than when the insulation is placed against the wall, except if the existing wall suffers from damp. If this is the case it is important that the void area behind the stud wall is well ventilated so that the moisture that is coming through the wall is allowed to escape.
This covers the full range of options that are available to insulation walls internally. There are a few areas that will pose a few problems when installing your insulation yourself and do require a little thought in advance.
Dealing with Services and Reveals with Internal Wall Insulation
The most effective way to get the services (wiring and pipe work) into your newly insulated wall is to provide a service void in the wall. In many case this will not be needed, but make sure that when pipework or wiring passes through the vapour barrier there is a good seal around them.
Make sure that the service void is on the inside of the vapour barrier. The void can be created by adding a second layer of battens providing the space to run the service between the insulation and the plaster board.
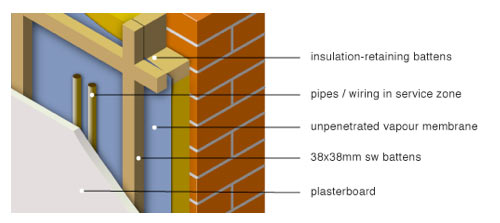
How to add a service void to internal wall insulation – Image courtesy of GreenSpec
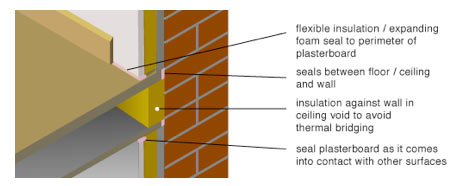
Dealing with the reveals around doors and window can be a very tricky part of fitting insulation to an internal wall. It is important to do this as this is where a significant amount of heat that can be lost and thermal bridging can occur.
Space will be limited so it will almost certainly be necessary to remove the plaster from the existing wall in the reveal. You can then add the insulation with plasterboard over the top. It is important to ensure a good seal to the door or window frame.

How to insulate the reveals around doors and windows when insulating an internal wall – Image courtesy of GreenSpec
Internal wall insulation is a great project to do yourself, and over half the cost will be the labour so it can make a great saving over getting someone in to do it for you.
It also offers a great return from the energy saved as a reduction in your bill. Our top tip is not to skimp on the materials as the better the insulating properties of the insulation that you use, the better the results for your efforts.
All project content written and produced by , founder of DIY Doctor and industry expert in building technology.
Source: https://www.diydoctor.org.uk/projects/insulatingwalls.htm


0 Komentar